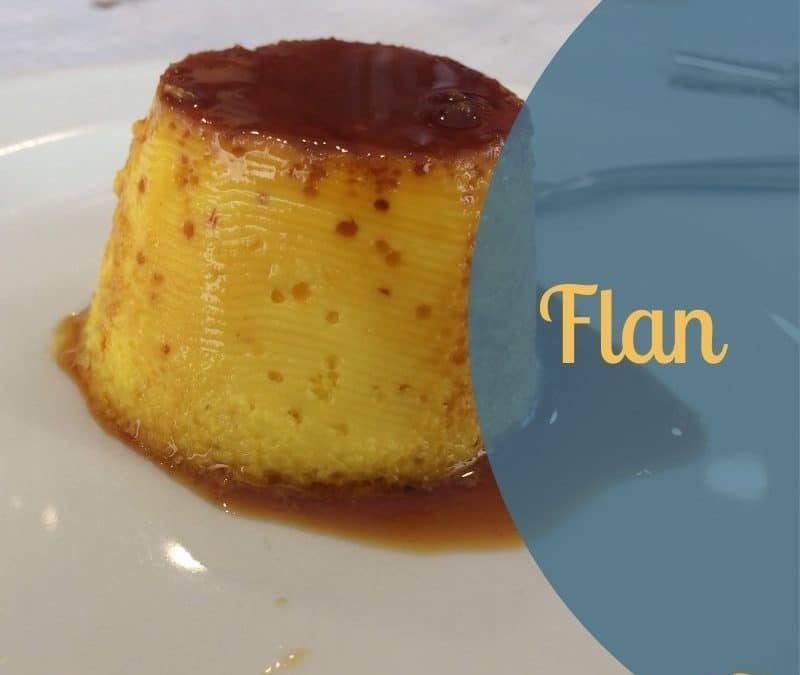
Flan

Flan

nWho hasn’t come across flan as one of the dessert options on a menú del peregrino or a menú del día on the Camino de Santiago?

Flan is a very popular postre (dessert), and it is in fact an ancient dessert. Its origins go back to the times of the Roman Empire, although the old recipe was little different: there was no sugar back then, so miel (honey) was used instead.

Another difference was that the old version was sprinkled with pimienta (pepper). Today, flan is covered in liquid caramel.

The name flan first appeared in the Middle Ages and it could both a sweet and a savoury dish. In those days, people ate flan during Cuaresma (Lent), when carne (meat) was not allowed.

So, as you can see, flan has been around for a very long time and it’s always been popular, either as a dessert or as part of the main meal.

You can buy ready-made flan in any Spanish supermarket but a homemade one always tastes better.

It’s actually quite easy to make and it only needs basic ingredients that you can find anywhere. In fact, you only need 3 ingredients for the basic recipe: huevos (eggs), leche (milk) and azúcar (sugar). However, it is common to infuse the milk with vainilla (vanilla), canela (cinnamon) or limón (lemon).


Let’s make flan!

You will need:
  • 4 huevos (eggs)
  • 1/2 litre leche (milk)
  • 4 tablespoons azúcar (sugar)
  • vanilla, a cinnamon stick, lemon peel
  • caramelo líquido (liquid caramel). In Spain, you can buy this, ready-made, in any supermarket, but you can also make your own. You just need sugar, water and a pan. Two parts sugar, 1 part water.
So, put 6 tablespoons of sugar and 3 tablespoons of water in a heavy-based pan and place over a medium heat to dissolve the sugar. When it starts bubbling up and taking a golden colour, reduce the heat and stir. Keep stirring until it becomes the colour of honey. If you like it more runny, you can add at this point 2 or 3 tablespoons of hot water. But be careful! The caramel is extremely hot and it can spit when you add the water.


Let it cool down for a couple of minutes and then pour on your flan mould(s), making sure you cover the base and the sides.
 
 
Now you can prepare the rest:

– Preheat the oven at 180ºC

– Infuse the milk with the flavour of your choice: bring the milk to the boil with a cinnamon stick and some lemon peel. When it starts boiling, remove it from the heat and let it cool down.

If you’re using vanilla extract, you can simply add a teaspoon to your mixture.

For a classic flan de huevo, skip this step.

– Combine the eggs and the sugar together until the sugar dissolves. The final result should have a jelly-like texture, wobbly and smooth. That’s why you should simply stir the eggs and the sugar together, not beat them. Beating them would add air to the mix, which would result in your flan being full of little ‘holes’ or air bubbles. Not what we’re looking for.

– Add the milk to the egg and sugar mixture and pour everything into your mould. You can use 6 individual moulds or 1 bigger one.

– Place your mould(s) on a baking tray with hot water (bain-marie). The water should not cover more than half of your moulds. Cover with foil and put into the oven.

Cooking time will depend on the size of your mould. If you’re using a bigger one, your flan will need around 45 minutes. If you’re using individual moulds, 30 minutes might be enough. Just check that the mixture is set.

– Take them out of the oven, remove them from the hot water and let them cool down at room temperature. Once they’re cold, you can put them in the fridge.

– When you’re ready to eat them, run a knife around the edge of the mould and flip it onto a plate. Your flan is ready!


Flan variations

You can also make the classic recipe with condensed milk. In that case, you won’t need sugar. For a 4-egg flan, you will need a small tin of condensed milk. You can use the tin to measure the milk: you will need 2.5 tins of milk.


Apart from being delicious, this is also a very versatile recipe. You may come across many different variations: chocolate, coffee, cheese, coconut, berries…


I like to make flan de manzana (with apple). You peel and cut 4 apples in pieces and place them in a pan with a very small amount of water, a cinnamon stick and lemon peel. You let them cook until the apples are soft (I like to find apple chunks but if you don’t, you can let the apples cook longer). You then add this apple compote to the egg, sugar and milk mixture and follow the rest of the instructions for the classic flan.

If you prefer a chocolate one, you warm up the milk and melt some dark chocolate into it. For a coffee one, add a couple of espressos. You get the idea…


So, which one are you going to make?


Today’s Spanish words

For the pronunciation of huevos, azúcar, canela and limón, check Tarta de Santiago.

For the pronunciation of menú del día and menú del peregrino, check Eating on the Camino.


Make sure you don’t miss any posts by subscribing for free here. That way, when a new post is out, you will get it in your inbox. And… you get access to exclusive content too.


¡Buen Camino!

Vieiras, the Galician way

Vieiras, the Galician way

Vieiras, the Galician way | 

There are 2 things that immediately make you think of the Camino when you see them: flechas amarillas (yellow arrows) and conchas de vieira (scallop shells). They are the most recognisable symbols of the Camino and the ones you start noticing everywhere once you decide to do a Camino. 


Yellow arrows on the Camino are a recent development (keep reading to learn more about them). But scallop shells have always been a symbol of the Camino. They say that pilgrims who reached Santiago were given one as proof that they had completed their pilgrimage and also to differentiate those on their way to Santiago from those on their way back home (remember, back in the day pilgrims had to walk from home and back).


The use of the scallop shell as a symbol of the Camino is documented since the beginnings of the pilgrimage to Santiago and there are several theories as to why it is a scallop shell and not something else. But that’s not what we’re discussing here today.


Scallops are also one of Galicia’s signature dishes. But, unlike the humble caldo gallego and pimientos de Padrón, vieiras are eaten on special occasions. And they are usually always prepared the same way, the Galician way. Let’s learn how to do it. 


How to prepare vieiras, the Galician way

Disclaimer: I’ll tell you the way we always prepare vieiras in my family. Many of the recipes I’ve found online include ham and a small amount of tomato sauce. We don’t use those 2 ingredients but feel free to add them if you wish.


So, what do you need? 

Of course, you’ll need vieiras (scallops), plus the shells to present them. We normally calculate 2 vieiras per person. 


Let’s say you’re preparing 8 scallops. You’ll also need 2 medium cebollas (onions), 200 ml vino blanco (white wine), a teaspoon of pimentón (paprika),  pan rallado (breadcrumbs), aceite (oil, preferably olive oil) and sal (salt).


And how do you prepare them?

Depending on what kind of scallops you get, you may have to do different things, like opening them or not. In any case, you need to make sure both your scallops and shells are clean.


Chop the onions finely and cook them over a medium heat in a frying pan with some olive oil.


Add the paprika and the wine and mix well. Season to taste. I like to add the scallops too and let them cook in this sauce for a couple of minutes (see picture on the left).


Organise the shells on an oven tray. Put one scallop on each shell and distribute the sauce evenly among them (see picture on the right).

Vieiras
Vieiras Galician way

Then, cover the scallops with some breadcrumbs and put them in a hot oven until they look golden.

And you have your vieiras, the Galician way, ready to eat! Easy, right? Yet still delicious.

Are you going to give them a try?


Las flechas amarillas

As promised, here’s more on the popular yellow arrows that show us the way. By the 20th century, the Camino the Santiago had almost disappeared into oblivion; the routes were not signposted and some stretches were not even passable.


D. Elías Valiña (1929-1989), párroco (parish priest) of O Cebreiro, was always very interested in the Camino and wanted to revive this ancient pilgrimage route, the Camino Francés in particular. He had a vision to bring the Camino back to its former glory and managed to convince other people (local authorities, other priests, Camino associations) to get involved.


Apparently, D. Elías travelled across Spain, from Roncesvalles, stopping to paint yellow arrows where he thought pilgrims might get lost. One of the stories about why he chose that yellow colour for the arrows is because he was able to purchase some yellow paint that had been left over from road words at a discounted price.


Today’s words of Spanish for the Camino


Make sure you don’t miss any posts by subscribing for free here. That way, when a new post is out, you will get it in your inbox. And… you get access to the subscribers area. I promise I won’t send you any spam.

For more info about food on the Camino, download my free guide.


¡Buen Camino!

Caldo gallego

Caldo gallego

Would you like a bowl of caldo gallego? Once you enter Galicia, you will find it in many menus, especially during the winter months.

We’re well into la primavera now. The weather was quite nice in marzo (March), but then abril (April) started and back came la lluvia (rain) and el frío (cold).

It’s almost mayo (May) now, but the weather is still quite unstable, so I decided to share the recipe for caldo gallego, the perfect dish to warm you up, as well as to get your energy back after a long day’s walk.


But what is caldo gallego?

Caldo gallego (or simply caldo) is a hearty soup made with potatoes, green leaves and beans. As with most traditional dishes, there is not one recipe only, but many variations. And it’s best to prepare a big pot that will last at least a couple of days: caldo tastes much better the day after you make it.

This was originally a farmers’ dish, and it was also a vegetarian dish most of the time, mainly because meat was scarce. As living conditions improved, adding meat to the broth became more common. And even if you don’t see any meat on your plate, el caldo gallego is hardly ever a vegetarian dish these days, as most people use a little piece of unto (cured pork belly fat) to add “substance”.

What do you need?

If you want to make this a vegetarian dish, you will need 3 ingredients, plus salt.

  • 200g de alubias blancas (white beans).
  • 4 patatas (potatoes).
  • 300g de grelos (turnip tops, in the picture), repollo (white cabbage) or berzas (collard greens).
grelos para caldo

 If you are not making it vegetarian, then you have several options.

As I already mentioned, most people add a little piece of unto, which you can substitute with some pancetta. You can also add carne (meat), usually beef or pork, a ham bone and/or chorizo. Some people add all of the above, some others just one or two things… It’s really up to you.


How do you make caldo?

If you’re using dried beans, you need to leave them to soak in water for 10-12h, but you can skip this step if you use cooked beans.

  • For the vegetarian version, using dried beans:

First, put the beans into a big pot and cover them with water. Bring to the boil, skimming off the foam when needed.

Let them simmer for 45 minutes to 1 hour, until the beans start to soften. Meanwhile, peel and chop the potatoes; wash whatever greens you are using and remove any thick stalks they may have.

When the beans start to get soft, add the potatoes and greens to the pot and let everything simmer for another 20 minutes or until everything is tender. And don’t forget to add salt to taste.

  • If you are using cooked beans, boil the potatoes and greens first and, when they start to soften, add the beans. Let them simmer for a few more minutes.


  • If you are using unto or meat, add them to the pot at the beginning, with the beans. That’s if you’re using dried beans. Otherwise, you can let the meat cook for a bit before you add the potatoes and greens. Chorizo does not need to cook for so long. You can add it within the last 10 minutes.

Before you serve it, take the meat and chorizo out and cut them into pieces. Serve in a big bowl with crusty bread.

¡Buen provecho!


Today’s words of Spanish for the Camino

Gazpacho

Gazpacho

Gazpacho |

It’s the end of September. Es otoño (it’s autumn). However, the temperatures this week have been very high, so it still feels a lot like summer. It gets a bit chilly early in the mornings and then again in the evenings but quite hot during the central hours of the day. ¡Hace calor! (it’s hot!).

It’s always important to stay hydrated but we must be extra careful in this kind of heat. In the south of Spain they know a lot about very hot weather so they came up with the perfect solution: gazpacho.

What is gazpacho?

Gazpacho is a cold soup. Its main ingredient is tomate (tomato), but it has other vegetables too. So it’s refreshing AND it’s also full of vitamins and minerals.

Gazpacho originated in Andalucía, in the south of Spain that’s why it’s also called gazpacho andaluz. But you can find it in other regions too. And as it happens with most traditional dishes, it has many variations.

Here’s the basic recipe.

You will need:

  • 1/2 kg tomates – they should be very ripe. In order to peel them, dip them in very hot water for a few seconds. The skin will come off very easily.
  • 1/2 pimiento verde (green pepper)
  • 1/2 pepino (cucumber)
  • Ajo (garlic), 1 clove
  • Aceite de oliva (olive oil)
  • Vinagre (vinegar)
  • 1 slice of pan (bread) – you need to soak it in a bit of water.
  • Sal (salt)

Chop the tomates, pimiento and pepino and blend them together with the ajo and pan. Season to taste with the aceite de oliva, vinagre and sal. Keep it in the fridge for one hour at least. And it’s ready!

Gazpacho can be taken as a soup or as a drink. When served as a soup, it is common to garnish it with croutons, cucumber and tomato cubes and chopped onion and egg. Actually, some people also add cebolla (onion) to their gazpacho, but not everybody does.

If you are planning to drink it, you can add some water, so it’s not so thick and you can also leave the bread out.


Gazpacho’s benefits

Gazpacho is refreshing and nutritious, but it has other benefits too:

  • It’s very easy to prepare!  All you need is a few basic ingredients and a blender. No cooking necessary.
  • It’s suitable for vegetarians and vegans. If you are ordering it at a restaurant, just remember to ask about the egg. It’s not part of the recipe, just a possible garnish. So even if the restaurant normally serves their gazpacho with some chopped egg, they should be able to accommodate you.

If you can’t remember how to ask about the ingredients in a dish, check my previous post Soy vegano/a.

  • It’s potentially suitable for coeliacs too. If you are not preparing it yourself, just remember to ask whether they’ve added pan.
  • You are on the Camino. It’s hot and you want some gazpacho but you can’t find it in bars/restaurants and you can’t prepare it. No worries! You can find it in supermarkets, in the chilled section, ready to drink.

Have you tried it already? No? What are you waiting for? Go get some gazpacho now!


For the pronunciation of pan, check Shopping on the Camino

For the pronunciation of aceite de oliva and sal, check Pulpo á feira


Today’s Spanish words and phrases


Make sure you don’t miss any posts by subscribing for free here. That way, when a new post is out, you will get it in your inbox. And… you get access to some exclusive content too. I promise I won’t send you any spam.


¡Buen Camino!

Tortilla de patatas

Tortilla de patatas

Tortilla de patatas |

What’s the first dish that comes to mind when you think about typical Spanish food? Hands up those who are thinking “paella”!


Well, paella is very popular. But it’s not a typical Spanish dish. Paella is really a creation of Valencian cuisine -the region of Valencia is on the Mediterranean coast.


Every region in Spain has its own traditional dishes. Examples are pulpo in Galicia or gazpacho (cold tomato soup) in Andalucía.


So, is there any dish that is not particular to a region? The answer is… tortilla de patatas (omelette), a Camino classic. Unless you are alérgico a los huevos or vegano, I’m sure you will eat plenty of tortilla during your Camino.


About the ‘tortilla’ name

First of all, I’d like to clarify some wrong informations I’ve seen about the name of the dish. One “useful-phrase” list I saw included the following translations:

  • Tortilla – Spanish omelette.
  • Tortilla de patatas – Spanish omelette with potato.
  • Tortilla española – Spanish omelette with ham and onion. 

This is not correct. Basically, all three names refer to the same dish: an omelette with patatas (potatoes) and, in many cases, cebolla (onion) too. If it doesn’t have patatas, then we call it tortilla francesa (French omelette). And if it has jamón (ham), then it’s just a tortilla con jamón.


The first written records of tortilla de patatas date back to the 18th century. There are different theories about its origins, but they all have something in common: tortilla was created while trying to come up with a nutritious and filling food in times of poverty and famine. 

OK, you’ve tasted it already and now you would like to recreate it at home. I’ll tell you how. It’s very easy!


First, we need to decide… ¿Con o sin cebolla? (With or without onion?). 

This issue generates very heated debates in Spain. Some would argue that a “real” tortilla española must have onion, whereas other don’t think it’s an essential ingredient. You decide how to make yours!


To make tortilla de patatas you will need…

Patatas – around 300g

Huevos – 5 or 6

Cebolla (optional) 

Aceite (oil) – plenty of olive oil to fry the potatoes. You can also use sunflower oil.

Sal (salt)


Here’s how to prepare your tortilla:


  • First, peel and thinly slice the potatoes. Chop the onion if you are using it.
  • Pour the oil in a frying pan and heat. When the oil is hot, add the potatoes (and onion) and let them fry on a medium heat until they are golden.
  • While the potatoes are frying, crack and beat the eggs in a big bowl. 
  • Drain the potatoes (and onion) from the oil and mix them with the beaten eggs. The mixture should be runny. If it’s too thick, you can add more egg. Season with some salt. Let the mixture rest for a few minutes.
  • You won’t need all that oil for the next part. So, you can just pour it into a container; if you’re using olive oil, you can reuse it a few times, when making your next tortillas!
  • Put the frying pan back on the heat, with just a small amount of oil. When it’s hot, add the egg and potato mixture and let it cook for a few minutes. Give it a shake or run a spoon through the edges to make sure it’s not sticking.
  • Then, the tricky part comes: get a plate that’s bigger than your frying pan and use it to turn the tortilla. Carefully flip the frying pan over the plate and tip out the tortilla, then slide it back into the pan. Cook for another 5 minutes, or until cooked through.


tortilla de patatas fry the potatoes

Slice and fry the potatoes

tortilla de patatas beat the eggs

Beat the eggs

tortilla de patatas pour mixture

Your tortilla de patatas is ready. All you have to do is serve and enjoy!

Tortilla is a very versatile dish. The one you will find in most bars and cafés along the Camino will be the basic tortilla: eggs, potato and probably onion too. But you can add many ingredients to it: pimientos (peppers) are very common, chorizo, champiñones (mushrooms)… What are you going to add to yours?

tortilla con espinacas

Here’s a tortilla I made with spinach

La tarta de Santiago

La tarta de Santiago

Tarta de Santiago |

Galicia is well known for its gastronomy. Pescado (fish) and marisco (seafood) are one of its main culinary attractions. You can read a bit about it and learn how to prepare pulpo á feira in this previous post.

But there’s more than fish and seafood. If there is one traditional dish that also symbolises the Camino, that’s the tarta de Santiago. In case you haven’t heard about it, tarta de Santiago is an almond cake, typically decorated with the shape of a Santiago cross.

The origin of this cake is unknown, but the first written reference to an almond cake dates back to 1577. Back then it was referred to as torta real or royal cake. However, we must wait until 1838 to find the first recipes of tarta de almendra (almond cake).

The decoration in the shape of a cruz (cross) was introduced in 1924 by Casa Mora, a pastelería (cake shop) in Santiago de Compostela. In fact, this pastelería is still in business, although its name has changed a bit: it’s now Pastelería Mercedes Mora and you can find it at rúa do Vilar, 50.

You can find it on many shops and pastelerías along the Camino, but if you want to try it at home, it’s very simple to make.


So, let’s bake a tarta de Santiago


The traditional recipe is made up of just tres ingredientes (ingredients) in equal parts: almendra (almond), azúcar (sugar) and huevos (eggs), so it’s sin gluten. You can add a bit of limón (lemon) or canela (cinnamon) flavouring if you prefer.


  • First, take 3 huevos, 200 g de azúcar and 200g de almendra (get whole almonds and grind them yourself or buy almond flour; both options are fine).


  • Then, mix all 3 ingredientes. This cake doesn’t have any raising agent, so it’s a good idea to beat the eggs and sugar together first, before adding the almond. But your cake will still be yummy if you don’t. You can add lemon zest or cinnamon if using any flavourings. The resulting mixture will be quite thick.


  • Pour the mixture into a round cake tin and bake in a preheated horno (oven) for about 30 minutes at 180ºC. It needs to be cooked inside and slightly golden outside.   


tarta de santiago ingredients
tarta de santiago mix
tarta de santiago


  • And finally, decorate it! There are hundreds of cross templates online. I used this: https://www.hogarmania.com/archivos/201407/plantilla-cruz-tarta-santiago.pdf. Just print it, cut it out, place it on top of my cake and sprinkle with powdered/icing sugar. I was in a bit of a hurry to finish, so my decoration didn’t turn out as well as I would have liked. But the cake was still delicious!


If you want to reuse your template (and prevent messing the presentation up like I did), my suggestion is to copy your cruz on a harder material than paper.


Today’s Spanish words


Make sure you don’t miss any posts and other news by subscribing for free here. That way, when a new post is out, you will get it in your inbox. And… you get access to exclusive content too.


¡Buen Camino!